 |
When we upgrade to the SF330 will we still be able to use our current data and forms? |
Absolutely! By upgrading to the new SF330 you will simply be adding more functionality to the current program and you will retain ALL of your information and forms. In fact, much of your current information will be used on the new SF330's. You can easily convert your SF 254/255 database information to the SF330 by using the SF330 tab in each database file and clicking on the  button. Any fields that are EMPTY will be translated and filled automatically. button. Any fields that are EMPTY will be translated and filled automatically. |
|
|
The new SF330 only provides space for one resume (Section E) and one project (Section F), yet it states in the instructions that you can submit up to 10 of each? How do I create those extra pages? |
There are a variety of ways that Government Forms Software allows you to add extra pages the form:
| 1. |
|
Use the New Form - SF 330 command on the File menu and select the appropriate number of pages for Section E, Section F and even Section H, and then click the Create Form button.
Sample Screen
|
| 2. |
|
Open any SF330 and move to a Resume (Section E) or Project (Section F) page and then use the Duplicate Page command on the Format menu.
|
| 3. |
|
Use the Insert Page(s) command on the Format menu.
|
| 4. |
|
When on a Section E or Section F page, right-click your mouse outside of the current field and use the Copy command. Then move to the next page, right-click your mouse again and select Insert Page.
|
| 5. |
|
From the File Tree (F12) drag-and-drop a Section E (resume) or Section F (project) from the custom pages under the SF 330 folder directly onto the form. You will be prompted to Add this page to the form?, to which you will reply Yes.
|
|
|
|
I've added and switched the position of some pages in my newly generate SF330, how do I automatically renumber (repaginate) the entire form? |
|
Use the Renumber Pages command on the Format menu. This new feature allows page renumbering Sequentially (1,2,3,4...) or Sectionally (1,2a,2b,2c,3a,3b,3c...). Another option is to manually change each page number by using the Form - Text command on the Format menu and locating the page number in the Text String list box and changing its Text properties to the desired page number. The page numbers are usually located near the bottom of the Text String list.
|
|
|
On the SF330, Part I, Section F Block 24, should the project photos be inserted on the page, as an attachment, or an appendix? |
|
Generally, unless an agency directs otherwise, the photos should be inserted in Block 24. Any space not used in Block 25 can be reallocated to enlarge Block 24. GFS provides an automatic mechanism for this by simply right-clicking your mouse anywhere on Section F of the SF 330. Select the Item 25 command and assign the desired number of rows for the current page. In addition, the program will automatically resize any fields associated with Item 24. This functionality is also provided for Item 19 of Section E (resumes).
|
|
|
Item 10 on Part II of the SF330 asks for the Average Annual Revenue for the past 5 Years. Will GFS calculate that figure automatically? |
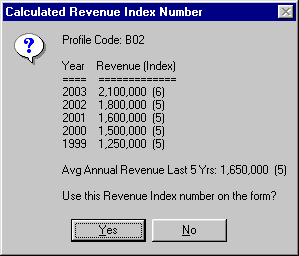 YES, provided that the appropriate information is entered in the Projects database. Using the SF330 tab in the Projects database, make sure that each project you want included in this calculation has a valid year in the Year Completed - Professional Services field and that "Include in calculations" is checked. In addition, be sure that an actual Revenue figure is entered for each Profile Code entered. Then, after selecting the Profile Code in Item 10 on the form, click the Sum Totals
  button when on the Revenue Index field. The resulting dialog is shown at right. button when on the Revenue Index field. The resulting dialog is shown at right.
|
|
|
The fields on Part II (Item 9 and Item 10) of the SF330 seem to be out of order, how can I fix that? |
|
If fields on Part II of the SF330 are out of order is usually the result of a corrupted page. To fix this problem, right-click your mouse on the form itself (outside of the current field) and click on the Resync Fields command. This command is only available for Section G & Part II of the SF330.
|
|
|
Concerning the rollover to the year 2001 and beyond on the SF 254, how do I change the "19"s to a "20"s on Item 9? |
| Open an SF 254 and use the Form - Text command on the Format menu. Somewhere around 31st item in the Text String list should be a "19". Change the Text property on the right from "19" to "20". Repeat the process for other years if necessary. Click the OK button. Note: Registered users can download the latest software update which does this process for you automatically! |
|
|
How do I make the information I have entered into the databases appear on the form? |
Although this questions only applies to the Executive Version, it is by far the most commonly asked question.
Click here for detailed instructions on this procedure and please feel free to print out the proceeding page as reference for the future. In general, you need to see this button  on the top ribbon in order to use the Lookup capabilities. on the top ribbon in order to use the Lookup capabilities.
 Real-time Tutorial Real-time Tutorial
To use the automatic calculation feature (summing totals) this button needs to be visible. This latter feature only applies to Item 10 of the SF 254 for the Number of Projects and Total Gross Fees fields. It assumes that you have already entered the Profile Code you wish to sum totals for. |
|
|
When selecting projects from the lookup list the wrong project (often the same one) appears on the form. What's wrong? |
| Each and every project needs a UNIQUE project ID number. Go back to the Projects database and make the necessary changes. Also, you will need to close and then reload the Projects Lookup list in order for your changes to be reflected. |
|
|
How do I insert graphic images (pictures) onto the forms? |
There are a few things to remember when using graphics:
• To insert a graphic image into the current field, right-click your mouse and choose Insert Picture from the popup menu.
• Before inserting a picture, use File - Preferences and adjust the Images use entire field and Maintain aspect ratio options under Program Settings to make the process act the way you need it to.
• Once inserted, pictures can be sized by pressing F7, or by adjusting the position of the small red dot on the bottom right corner of the picture when it is selected.
• Its often more convenient to add a new field to the form first (use Format - Form - Fields - Insert New Field), move and size that field to the desired location on the page using the Field Position button  (located on the top ribbon) and THEN insert a picture into the field. (located on the top ribbon) and THEN insert a picture into the field.
• Fields can be sized by holding down the Ctrl key WITHIN the borders of the selected field and then dragging and dropping any one of the four green border bars.
• Images must be in Bitmap (*.bmp), JPEG (*.jpg) or GIF (*.gif) format.
• Make sure the spacing between the lines is set to 0. Use Format-Paragraph to adjust this value for any field you wish to contain a graphic image.
• Use the Word Interface for more flexibility with images including many different formats (TIFF, PCX, PNG, AutoCAD, etc.).
|
|
|
I need to re-register the Trial Version but I can't find the serial number that was originally assigned to us. What should I do? |
| You need to send us an email and request that we forward you the registration information again. Be sure to include your company's name within the message. WE WILL NOT ISSUE A SERIAL NUMBER OVER THE PHONE! |
|
|
How do I move the program (and all of the forms and data) from one machine to another? |
First, you need to download the Trial Version from the web site and re-register it on the new machine (see above - your registration information is found under the File - Preferences menu command). Then you need to move ALL the files with the following extensions from the old machine to the new machine: *.dat *.lst *.254 *.255 *.330
In addition, there is a sub-folder called "\Images" under the Forms directory which contains all the images (*.bmp) used on the forms if you inserted pictures.
Make sure that you copy them to the correct folder on the new machine ("C:\GFS98" or "C:\Program Files\Government Forms Software").
If you do not have a Site License, DO NOT ATTEMPT TO ACCESS THE INFORMATION FROM A DIFFERENT MACHINE.
Finally, you will need to remove the program from the old machine by using the UnInstall GFS routine from the Programs menu under Government Forms Software. |
|
|
When trying to access the online Help system I receive the error "Cannot find the \gfs help file." or "The Help System is unavailable to UnRegistered Users!" What should I do? |
First, you may be missing the help file itself. You can download the latest one by simply clicking on this link gfs.hlp. Save this file to your GFS folder.
Or, your default program path may be set incorrectly. In the latest version of GFS, use the Preferences command on the File menu and click on the Advanced button to reset the default program path. Then exit and restart GFS.
|
|
|
Is there a limit on the amount of information I can enter? |
| No! Registered users may enter an unlimited number of consultants, resumes and projects. This is also no limit on the number of forms that can be produced and saved. |
|
|
How can I DUPLICATE the current page of the form? |
| Use the Duplicate Page command on the Format menu. Another way is from the page you want to duplicate, use the Copy Page command on the Form Context popup menu (right-click on the form outside of the currently selected field). Move to the location where you want to insert the new page and then use the Insert Page command on the Form Context popup menu to insert the page from the Page Clipboard. |
|
|
Can I use information from other applications? |
| Yes! You can copy and paste information from any Windows compatible program. In addition, our built-in editor understands RTF (Rich Text Format), which is common in many of today's popular word processors. Warning: Make sure you only paste RTF formatted text into GFS. Images and pictures are also not a problem. |
|
|
What about customizing the forms? |
| Absolutely! Every part of the form can now be modified. You can add, delete and move fields, lines, boxes, borders as well as change fonts and colors. In addition, we supply you with lots of preformatted custom pages (like single page resumes and variable projects per page) that will make your custom work a breeze. See Custom Forms. |
|
|
How do I add a predrawn custom page to the current form? |
First, feel free to download any of the customized pages here: Custom Forms.
Once you have download the desired customized page to the GFS Forms Folder (use File - Preferences to determine the forms folder) it should appear on the File Tree (toggle and refresh with F12) on the left side of the screen in GFS. Adding that page to the currently open form is simply done by highlighting it in the File Tree and then dragging-and-dropping it onto the currently open. This adds a new current page to the form and at this point you may need to remove the "old" page it is replacing and use Format - Remove page to avoid redundancy. |
|
|
When printing, why does the right side of my form get cut off? |
This can happen with DeskJet and InkJet printers that roll the paper past the print head. These printers have a hard right (or bottom) margin of up to 0.75", and will automatically eject the page when the printer rolls the page to this point. There are two possible solutions:
- Try switching to Legal size paper (although you will still use a regular 8½" by 11" sheet). This may trick the printer into rolling the paper a little further before it ejects the page. This is the "cleaner" solution because it will keep the form centered on the page.
- Move the form to the left 0.10". Use the Format-Form-Move command from the main menu.
This problem DOES NOT EXIST with laser printers.
|
|
|
How do I change the vertical line spacing of the project fields? |
|
Ideally you want to fit 4 lines of text into each field in the project information areas (SF 254 - Item 11 and SF 255 - Item 8 & 9). Use the Paragraph command from the Format menu or right-click on the field and use the Form-Context popup menu to change all the fields on the current page at one time (this is the better method!). Set the Between value under Spacing to -0.14 in order to "squeeze" the lines together.
|
|
|
When the form prints out why can't I see the text I've entered? |
|
|
Notice that we use blue as the default color for entering text onto a form. We do this so that it is easy to distinguish between what you are keying in and the form's text itself. If you can't see the text you have entered it is due to the fact that your printer is probably scaling the color blue to some very light shade of gray, or even white. To remedy this situation, change the font color to black. A quick way to do this is to right-click your mouse on the form itself (outside of a text field) and use the Font command from the popup menu. This method allows you to change the text on the current page or the entire form very quickly. Note: Version 98.3.1.66 has been modified to "print colors as black" but keep the proper color attributes when editing on the screen!
|
|
|
The Default Font Type and Size selected under File - Preferences will not appear on the forms? |
|
|
In order for the Default Font, Size and Color to be used the field in which you enter text on the form must be completely cleared. A field that looks empty does not mean that it still does not have any formatting within it! Use the Clear Fields command on the Edit menu to remove the entire content of the field. Warning! This will remove all the text in the field also! Another way to achieve the same results without deleting any text currently in the fields is to use the Form-Context menu. Place your mouse on the form (not in a selected text field) and right-click, then use the Font command from that drop-down menu to set the font attributes for all the fields on that page or entire form.
|
|
|
Why doesn't the form print correctly? (...the text and pictures are the wrong size.) |
|
|
Make sure the Zoom of each page of the form is set to 100% BEFORE printing. Use the Zoom command on the View menu to change the view. Certain printers (and networks) will not interpret the scaling of the form correctly so the only alternative is to not set any scaling (thus Zoom is 100%, or actual size).
|
|
|
When trying to open Profile Codes or Functions from the Data menu I receive the error "Required file missing". What should I do? |
|
|
|
|
I've have seen a list of different profile codes that have descriptions defined past 200? Where are they from? |
|
|
The U.S. Army Corps of Engineers has developed an extended list of profile codes similar to the list provided with the SF 254. They use this revised list for their ACASS system. You can download a copy of this list (codes.dat) and then overwrite the current file "codes.dat" on your GFS folder. Also, see Custom Forms for the list in a SF 254 style form.
|
|
|
When trying to spell check, the message "Error opening dictionary C:\Program Files\Government Forms Software\ENGLISH.DCT" appears. What's wrong? |
|
|
You are missing the dictionary file. You can download it by simply clicking on this link English.dct. Save this file to your GFS folder.
|
|
|
When editing a form, how do I select more than one field at a time? |
|
|
Hold down the Alt and click your mouse on the field you wish to select. Once all fields are selected you can use the Form-Context popup menu (right-click your mouse on the form outside of any text fields) to change field attributes of only those selected fields. To Deselect all selected fields use the Form-Context popup menu. All selected fields appear with an aqua background.
|
|
|
I lost the File Tree on the left side of the screen. Where is it? |
|
|
Use F12 to toggle the File Tree on/off.
|
|
|
When I attempt to run a report using the Reports menu, my system freezes. |
|
If your system freezes while attempting to run a report there more than likely is a problem with the report configuration (column settings). To remedy the problem you will need to set the report back to its original configuration. Follow these steps:
- Stop GFS by pressing Ctrl-Alt-Del (all at the same time) on your keyboard and then click "End Task".
- Restart GFS and select the report you are having problems with from the Reports menu while you have the Shift key on your keyboard depressed. (Simply hold the Shift key down while you click on the proper report from the Reports menu.)
- Click "Yes" when you are asked to reset the report format.
|
|
|
How do I quickly rename (or delete) a form? |
|
|
You can rename a form directly from the File Tree (requires Version 98.3.1.71 or higher) by first selecting the form (do not open it) and then press F2 and then enter the new name. Forms may be deleted directly from the File Tree by first selecting the form (do not open it) and then pressing the Delete key on the keyboard. Another way to rename a form is to open the form, then use File - Save As... to save to the form to a new name and finish by deleting the old one. You can also delete a form by using File - Open and then delete the form from the Open Form dialog window.
|
|
|
Which files need to be backed up in order to properly save all of my pertinent information? |
|
Any files on your Forms Directory and Data Directory (see File - Preferences command in the GFS program) that have the following extensions must be backed up:
"*.254" "*.255" "*.330" "*.dat" "*.lst"
|
|
|
How do I remove "phantom text" from the form? |
|
|
"Phantom text" is information that is displaying on the form in an undesired location. Generally it is data entered into a field and is then pushed out of the field's boundaries by the user pressing the Enter key (carriage return) and thus moving the test outside the edit area of the current field. In most cases the "phantom text" is data from a field located above its position on the form and can be removed by finding that field, selecting all the text (Ctrl-A) within that field, and then deleting it. Once that is done, click on the current page number on the top right on the screen to redraw the current page.
|
|
|
How to create a User DSN ODBC connection to your system for use with the Client/Server Version and MS Access. |
|
On the Data menu in GFS, click Data Source Administrator
or
From your Windows desktop:
- Click Start
- Click Run
- Open: odbcad32 [Enter]
(Note: On 64-bit systems the correct version of this utility may be in the "%windir%\SysWOW64" folder. You MUST run the 32-bit version of this utility, not the 64-bit, which Windows will do by default. )
If there is not an entry called "Government Forms Software" on the User DSN tab, then you need to add it. Follow these simple steps:
- Click Add
- If available, select "Microsoft Access Driver (*.mdb, *.accdb)" from the list.
For older 32-bit versions, simply use "Microsoft Access Driver (*.mdb)"
- Click Finish
In the next window, enter this:
- Data Source Name: Government Forms Software
- Description: Government Forms Software
- Database: Click Select
- Find and select GFS.mdb (or possibly GFS98.mdb on older installs) and click OK
- Click OK again
- Click OK once more to close the ODBC Datasource Administrator
Depending on the security settings of your system, this procedure may require the assistance of your network administrator.
Note: If you are using a 64-bit version of Windows and do not have MS Access installed on your machine then the
driver "Microsoft Access Driver (*.mdb, *.accdb)" mentioned above will probably not be available. You may download
and install this driver for free using this link:
Microsoft Access Database Engine 2010 Redistributable
|
|
|
I receive the error "The Client/Server Version requires that a User DSN called [Government Forms Software] must first be established in order to function properly." when I start the program. How do I fix it? |
|
|
|
|
When trying to Zip Data/Forms I receive the following error: "Unable to load GFS_Zip.dll!" |
|
|
You are missing the GFS_Zip.dll file which contains the routines for file compression. You can download it by simply clicking on this link GFS_Zip.dll. Save this file to the same folder where GFS.exe is located.
|
|
|
I need to set a filter on project records that are imported, is that possible? |
|
Yes. Add the following line to the [Preferences] key in the GFS.ini file located on your default Windows folder:
ImportMask=01
This example will import only those records whose key index begins with "01".
Also, if importing from an ODBC connection, you can also add the following to the same key:
ImportSQLPrjMask=Prj_ID like '01%'
The string value ("Prj_ID like '01%'") in this example represents an actual SQL statement that is run each time GFS attempts to retrieve information the ODBC data source.
|
|
|
How do I import information from the CTM/SF Reporter program? |
|
During the installation of the Trial Version of Government Forms Software select the CTM (SF Reporter) option on the Data Import Capability screen. Doing so will create a User DSN (or possibly system DSN) in the Datasource Administrator (odbcad32.exe) called CTM-GFS. This is the tool GFS uses to import information from CTM's SFReport.mdb (Microsoft Access Database). You will be required to know the location of that file (sfreport.mdb) on your hard drive or server.
Use the Import - Data command on the Data menu to import information from the CTM (SFReporter) system by selecting that option under Version. You will need to import information from all three databases (Firms, Resumes, Projects) one at a time. In addition, you can import previous SF254/255 forms created by CTM by first open either the Default.254 (or Default.255) and then using the Import - Forms command on the Data menu.
|
|